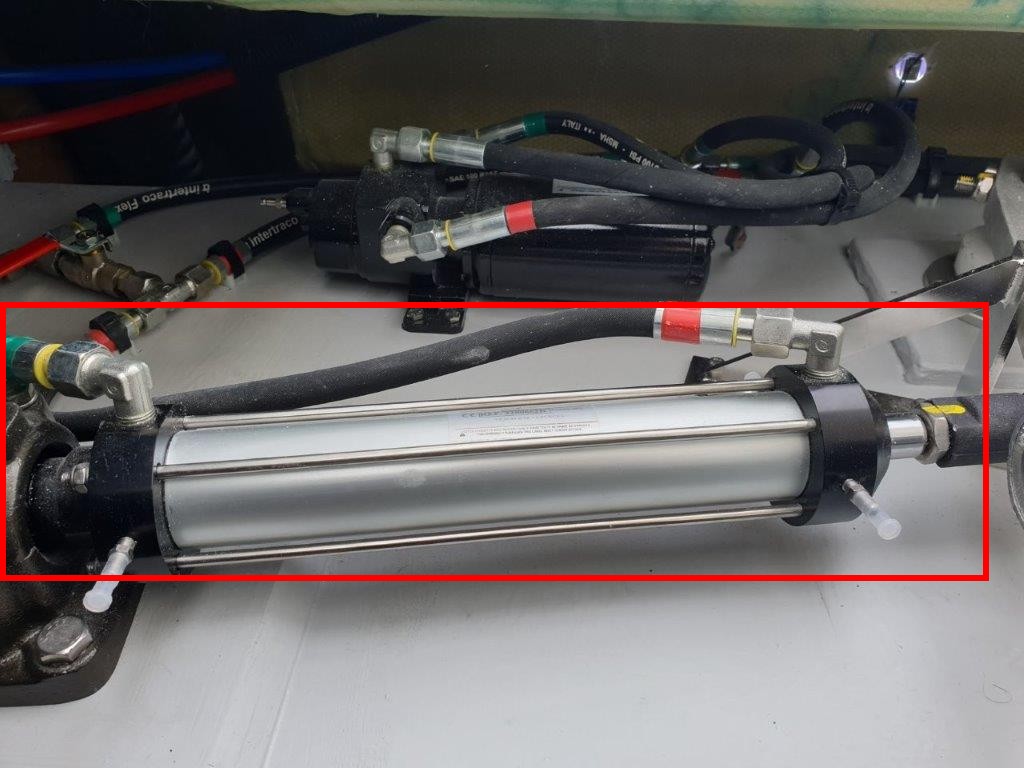
On our Saba 50 the steering system is a hydraulic system. The steering wheel operates a hydraulic pump, which itself operates a hydraulic cylinder (See Image 1 below) which pushes and pulls on the starboard rudder stock arm (Image 2 below). Note that we need to add a Rose Joint to this arrangement as the board that it is mounted on flexes and we are finding that the stainless steel bolt though the aluminium arm is leaving filings as it turns. John previously pointed out this problem to us and its on our jobs list.
Image 1: Hydraulic Pump for SteeringImage 2: Rudder Tiller
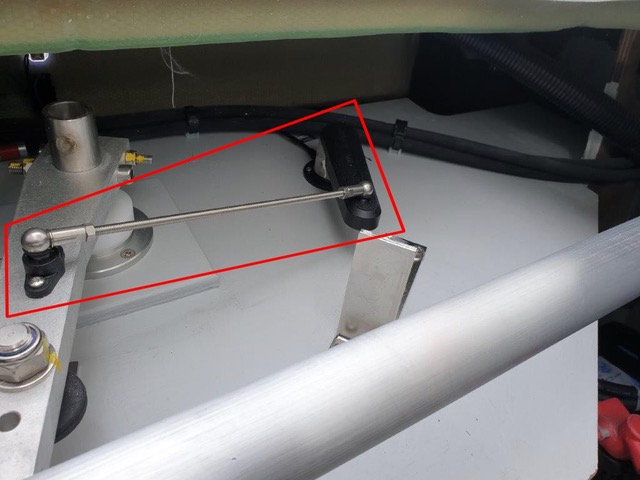
The starboard rudder is operated by the hydraulic cylinder and the port rudder is linked by a aluminium bar that joins both rudders together so that they move in unison.
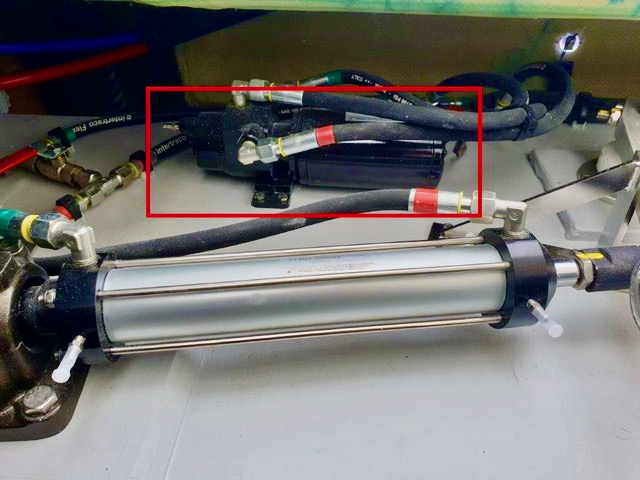
We ordered the Garmin autopilot from FP and this works with a hydraulic pump (Image 3 below), which is installed on the hydraulic circuit of the helm system.
Image 3: Autopilot Hydraulic Pump in Starboard Hull
The autopilot pump will turn the rudders in either direction , and works in a similar fashion to the hydraulic steering that is driven from the steering wheel.
It is important to note that if either the hydraulic pump for the steering fails (see Image 1 above), then we also cannot steer the boat with the autopilot either. FP provides emergency steering for the Saba that you have to stand in the engine room to try and use. Totally impractical.
So not only did we need a second autopilot in case our primary autopilot failed, we also needed one in case our hydraulic steering failed.
Our Solution
Uchimata installed a Leroy and Smitt (L&S) cylinder (See Image 4 below) and a hydraulic pump (Image 5) on the bit arm of the port rudder. Our primary autopilot on La Mischief was also a L&S hydraulic system and we were very comfortable with this. We also kept hold of the maintenance kit, which is a bit of a bonus.
Image 4: L&S Autopilot Hydraulic Linear Drive Unit in Port HullImage 5: L&S Autopilot Hydraulic Pump in Port Hull
The operating principle is the same as for the main autopilot, but is independent of the helm steering system, thereby providing redundancy for this system also. We can throw away our emergency steering system (but haven’t). The L&S autopilot cylinder directly actuates the port rudder, with the starboard rudder being actuated by the aluminium bar linking the two rudders together.
To reiterate, we can now have a hydraulic break in our boat’s helm system, the steering wheel pump, the helm system cylinder or the main autopilot’s hydraulic system pump, and we can still steer the boat as the port system is completely independent.
Each autopilot has its own head, and each are equipped with feedback (Images 6 and 7 below), there is one for the main pilot on starboard and there is one for the second pilot on port. So no matter which autopilot we are running, we can always tell where the rudders are.
Image 6: Feedback Arm for Port Hull (Secondary Autopilot)Image 7: Feedback Arm for Starboard Hull (Primary Autopilot)
The Second Autopilot
Now we have 2 autopilots on board, w must be extremely careful that we don’t have both on at the same time. This could be quite catastrophic.
Unlike boats with mechanical steering, on our Saba with its hydraulic steering the autopilot pump (See Image 3 above) is mounted on the hydraulic circuit and “closes” the system, meaning the steering wheel is effectively disconnected whilst the autopilot is engaged. Disengaging the autopilot “opens” the hydraulic circuit and allows the steering wheel to once again be engaged. Therefore to use the second autopilot we must also do this but manually by turning a ball valve to cut the pressure to the ram. This is the same ball valve that was installed to allow the emergency steering bar to be used.
Image 8: Bypass Valve in Starboard Hull (in closed position – Helm and Primary Autopilot in use)
When the second autopilot is used, the bypass valve (08) must be opened.
Whenever the bypass valve (Image 8 above) has been opened and then closed, its very important that you use the feedback (Images 6 and 7) to ensure that the rudders are in the axis of the boat.
Step By Step Guide to Using the Second Autopilot
Make sure the rudders are centred using the feedback on the Autopilot Head.
Make sure the main pilot is on stand-by.
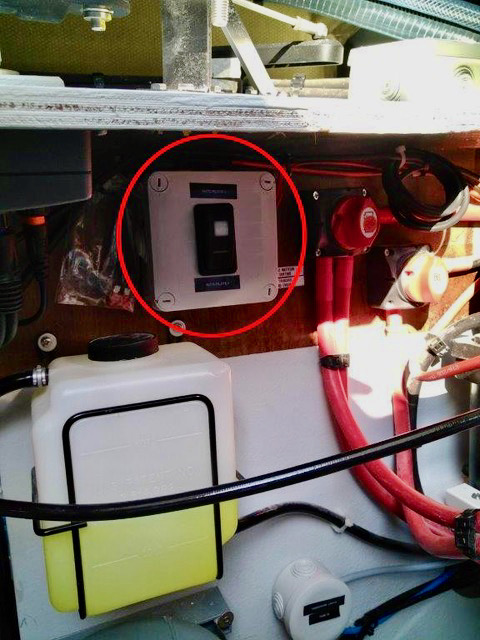
Power on the second port autopilot by setting the switch ( Image 9 Below) on the second pilot.
Image 9: The Power Switch for Moving Between Autopilots
4. Open the bypass valve (see Image 8 above) and simultaneously set the second autopilot to AUTO (Head unit is under winch).
At this point, the second autopilot will be steering the boat. Its important to note that manual steering is unavailable when this second autopilot is being used.
Moving Back to the Primary Autopilot
Make sure the rudders are centred using the feedback (see Images 6 and 7 above) that displays on the Autopilot Heads. This is very important.
Make sure the secondary pilot is on standby.
Power on the primary autopilot by setting the Power Switch (see Image 9 above) to the primary autopilot.
Close the bypass valve
Set the Primary Autopilot to Auto.
Test that the Steering works by disengaging the autopilot briefly to test.
Testing the 2nd Autopilot
The first time we tried it, it didn’t work. We had Sopromar in Lagos look at it and they set the “Drive Unit Class” to Solenoid and Voila!, we got power to the ram and it started working.
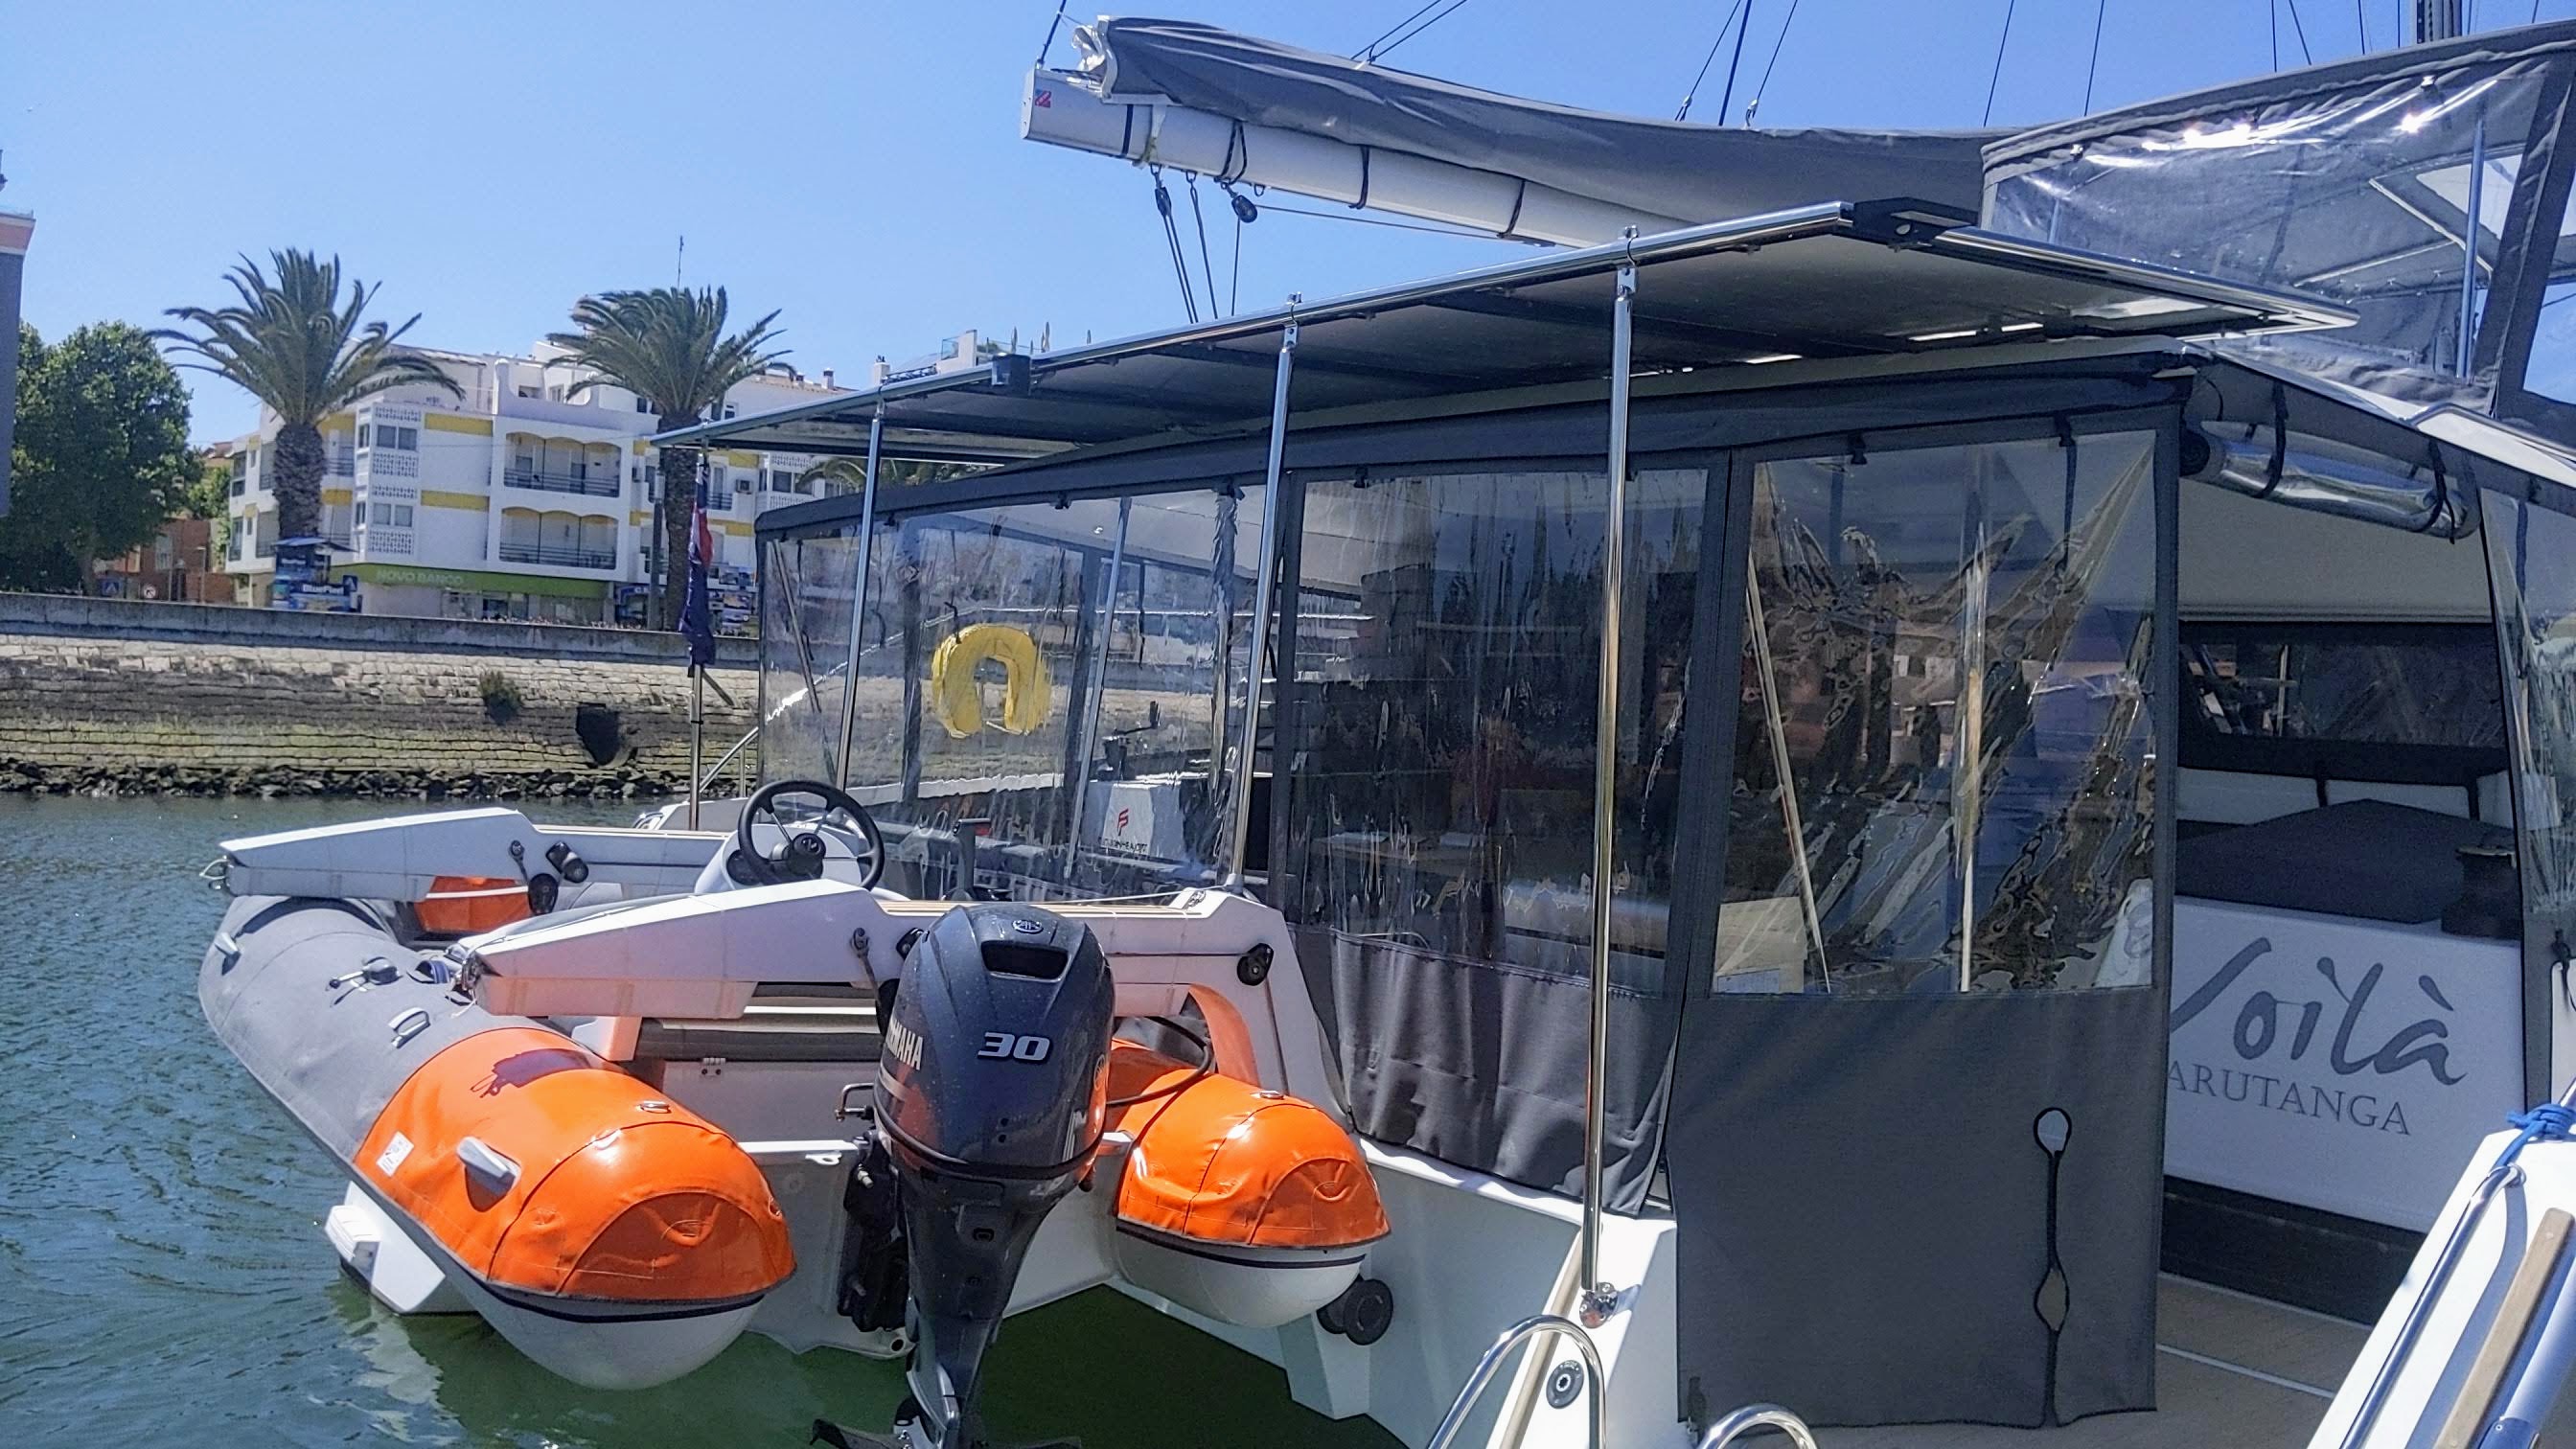
It’s been over a month since we left La Rochelle on 4th April and we’ve made it to Portugal where we have been able to take a deep breath. We can legally stay here until the end of the year because of a special Covid law Portugal has passed, so that is a relief. So now I have time for a bit of reflection on what was an extremely busy time trying to get the boat ready to sail out of La Rochelle.
We are really happy with Voila. Lots of space and she sails really well. There’s a few things we need to change but nothing that money and time can’t fix. After all she is a BOAT (Break Out Another Thousand!)
The other thing I want to mention up front is the unbelievable support and patience we received from Romaine (Roms), Multihull Solutions’ man on the ground in La Rochelle. No request was too much trouble and he worked day and night, 8 days a week to help all his owners get what they needed and out of La Rochelle and onto the ocean.
So here’s a few observations from our last month getting her ready.
Sun Power from Sunpower
The five 400W Sunpower panels have been performing reasonably well now that we have corrected 2 wayward panels. Loose wiring on one and a VE-Direct shutdown on another.
We are still having trouble with one controller/solar panel which keeps turning off saying there is insufficient PV Power. Still investigating.
We had originally specified Bluetooth dongles but got Uchimata to upgrade the Solar chargers to Smartsolar 30/100 MPPT Controllers that have built in Bluetooth and can also be networked together using Bluetooth so they play together under one master and 4 slaves. I think we will be able to survive our backward step from Lithiums to AGM batteries (albeit 900AH of them).
Turning Sunshine into AC
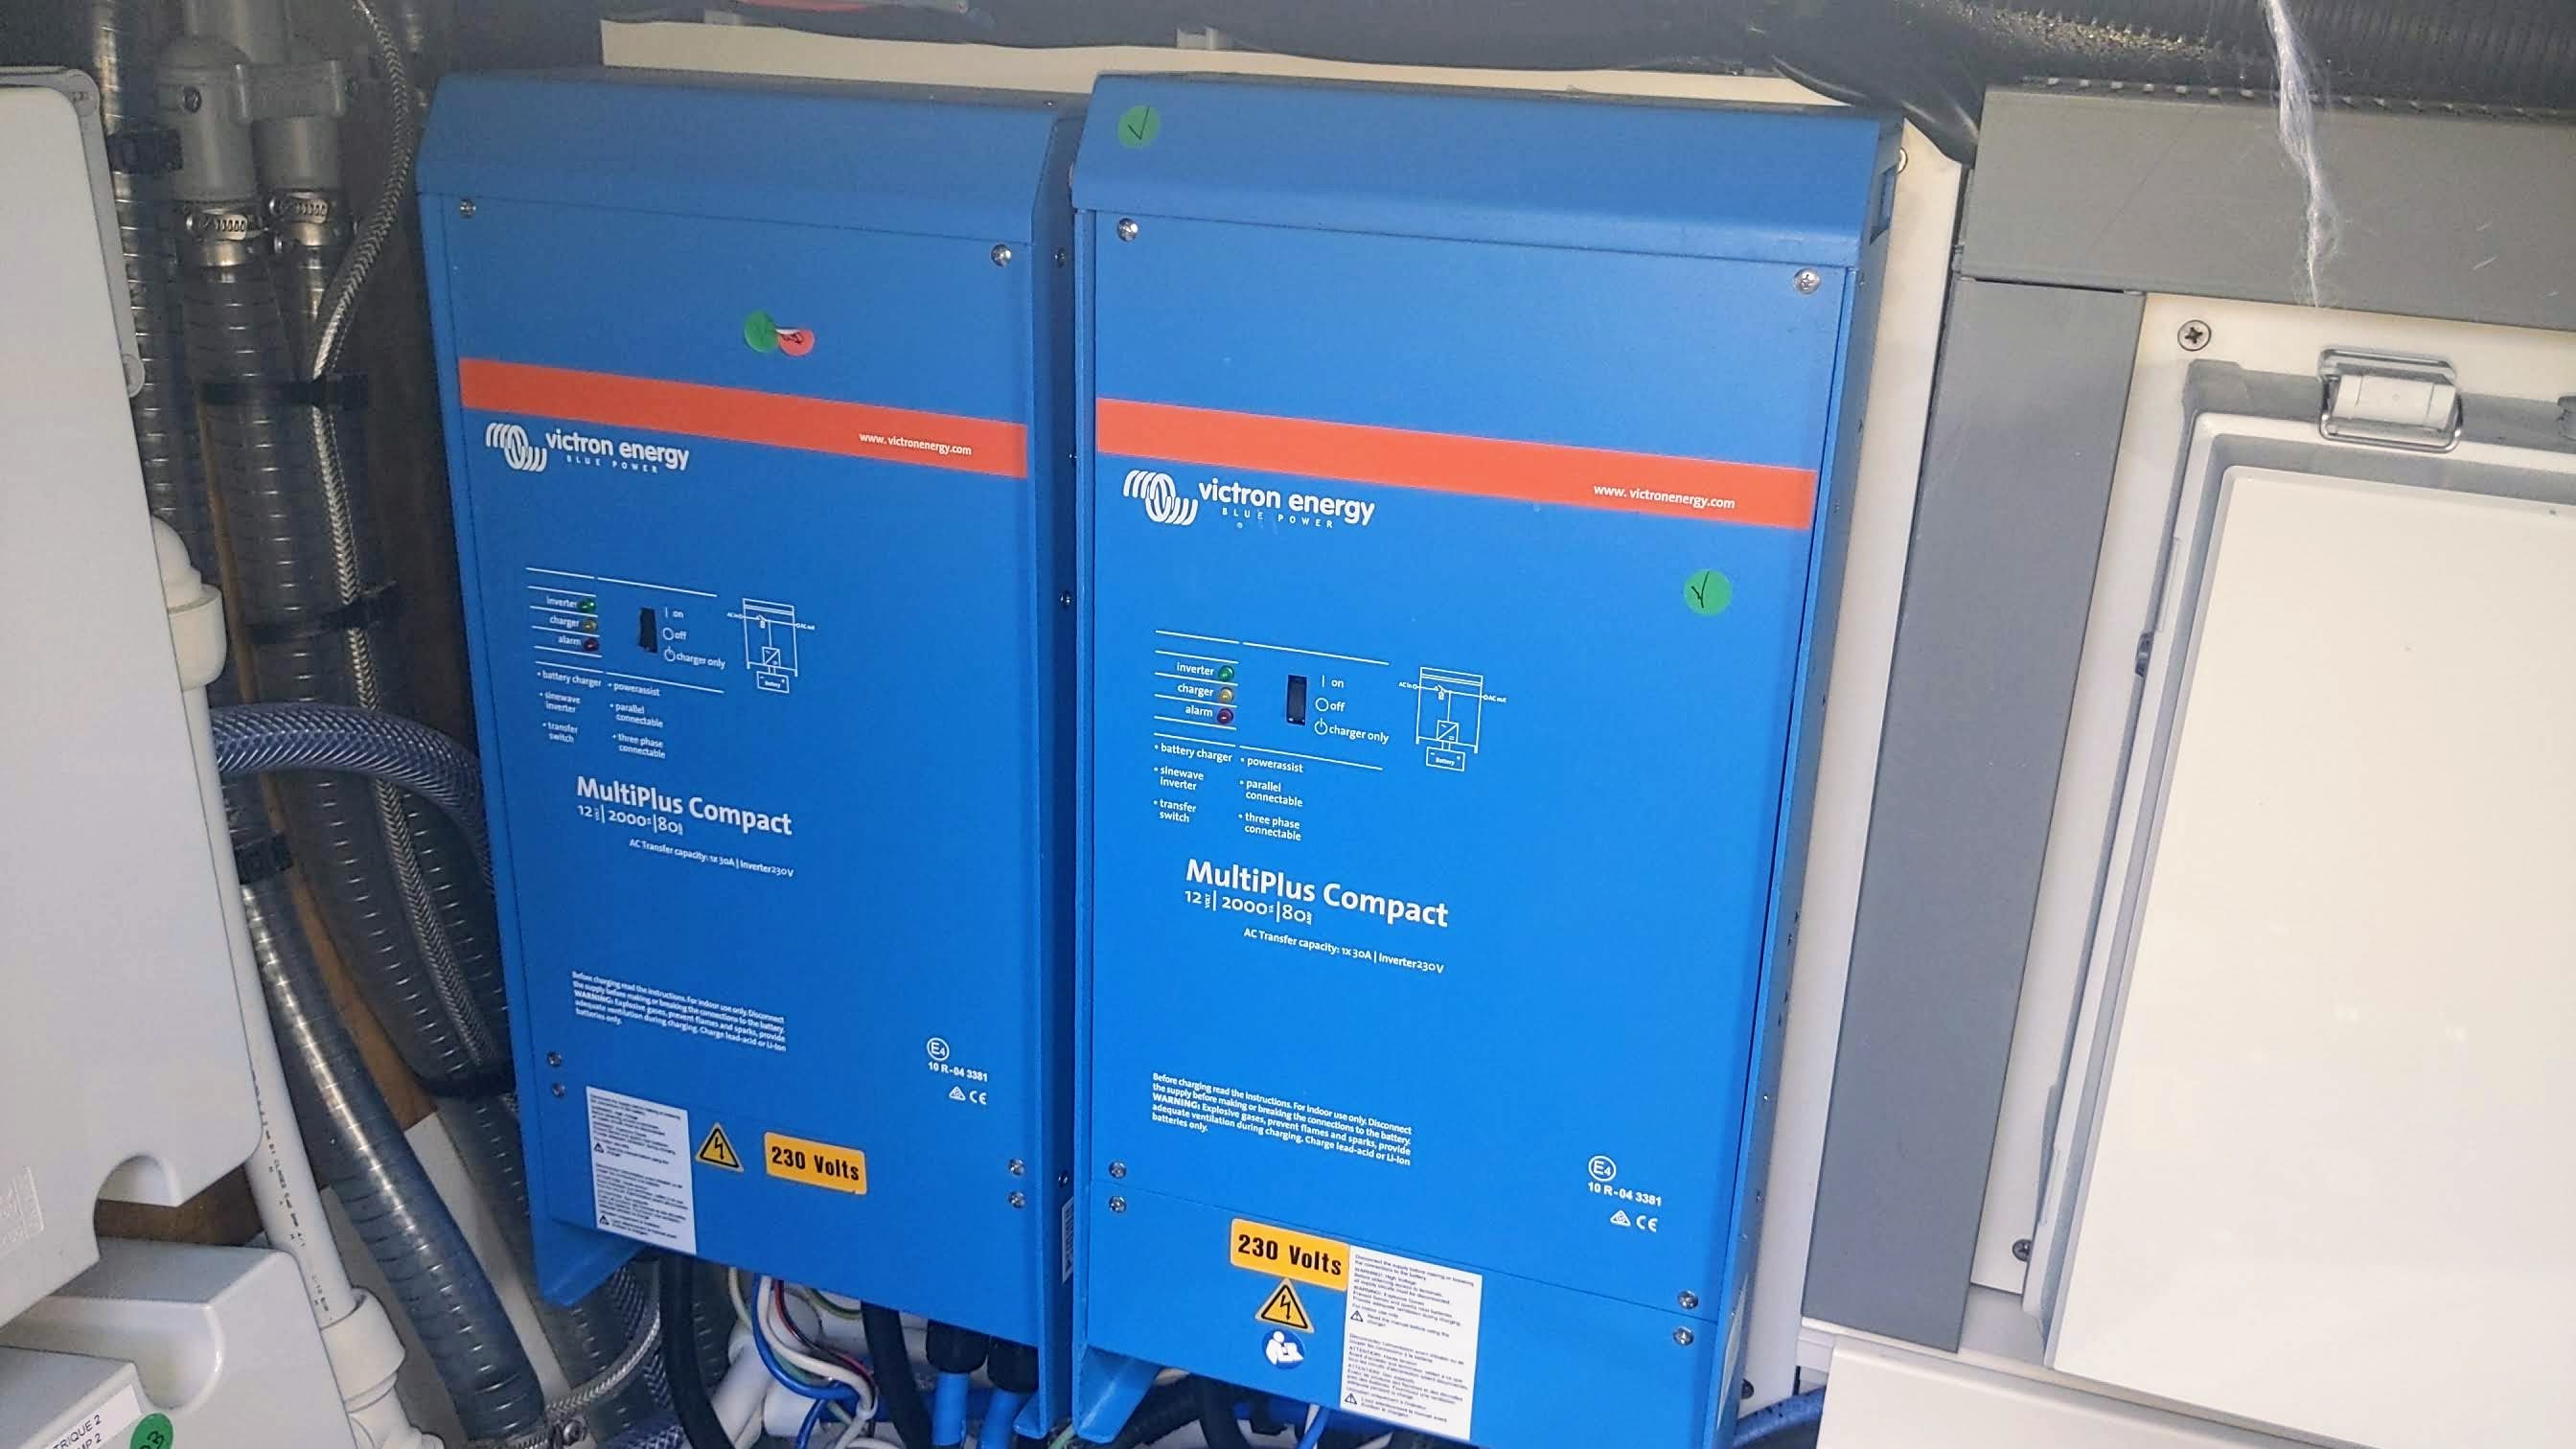
We quickly transferred over the Washing Machine and the Icemaker from Shore Power to the (Sun Driven) Inverters and watched our second 2000W inverter kick in on “Assist” mode to get us 4000W to run the washing machine and sometimes the electric kettle. Our plan of augmenting the existing 2000W Multiplus with a second similar unit seems to be working okay. And we quite like the idea of having a redundant inverter given we lost one on La Mischief and it was a real pain.
Stress Free Parking
The Volvo Throttles are very sticky and not at all smooth like the Yanmar throttles on La Mischief. They seem to be loosening up a bit and I’m getting more used to them as well as docking a 50 ft catamaran, so I think we will live with them. Especially if I indulge in a Jet Thruster (https://www.jetthruster.com) to help me and Dee get on the dock in any tricky situations.
Look Mum, No Hands
We got Uchimata to install a L&S Autopilot as a second backup unit, but we are yet to try it out because we have only just got the documentation on how to switch from one autopilot to another from Uchimata. Its more complicated than on La Mischief because of the hydraulic steering, which the primary autopilot is hooked up to. The installers once again did not take into account the need to service equipment and now we need to pull the whole unit out just to top up the transmission fluid. Unfortunately the French don’t like to collaborate with experienced owners (citing Covid), which is unfortunate as we can offer them a wealth of cruising experience (ie. fixing things in exotic places).
Where the F#!k Are We?
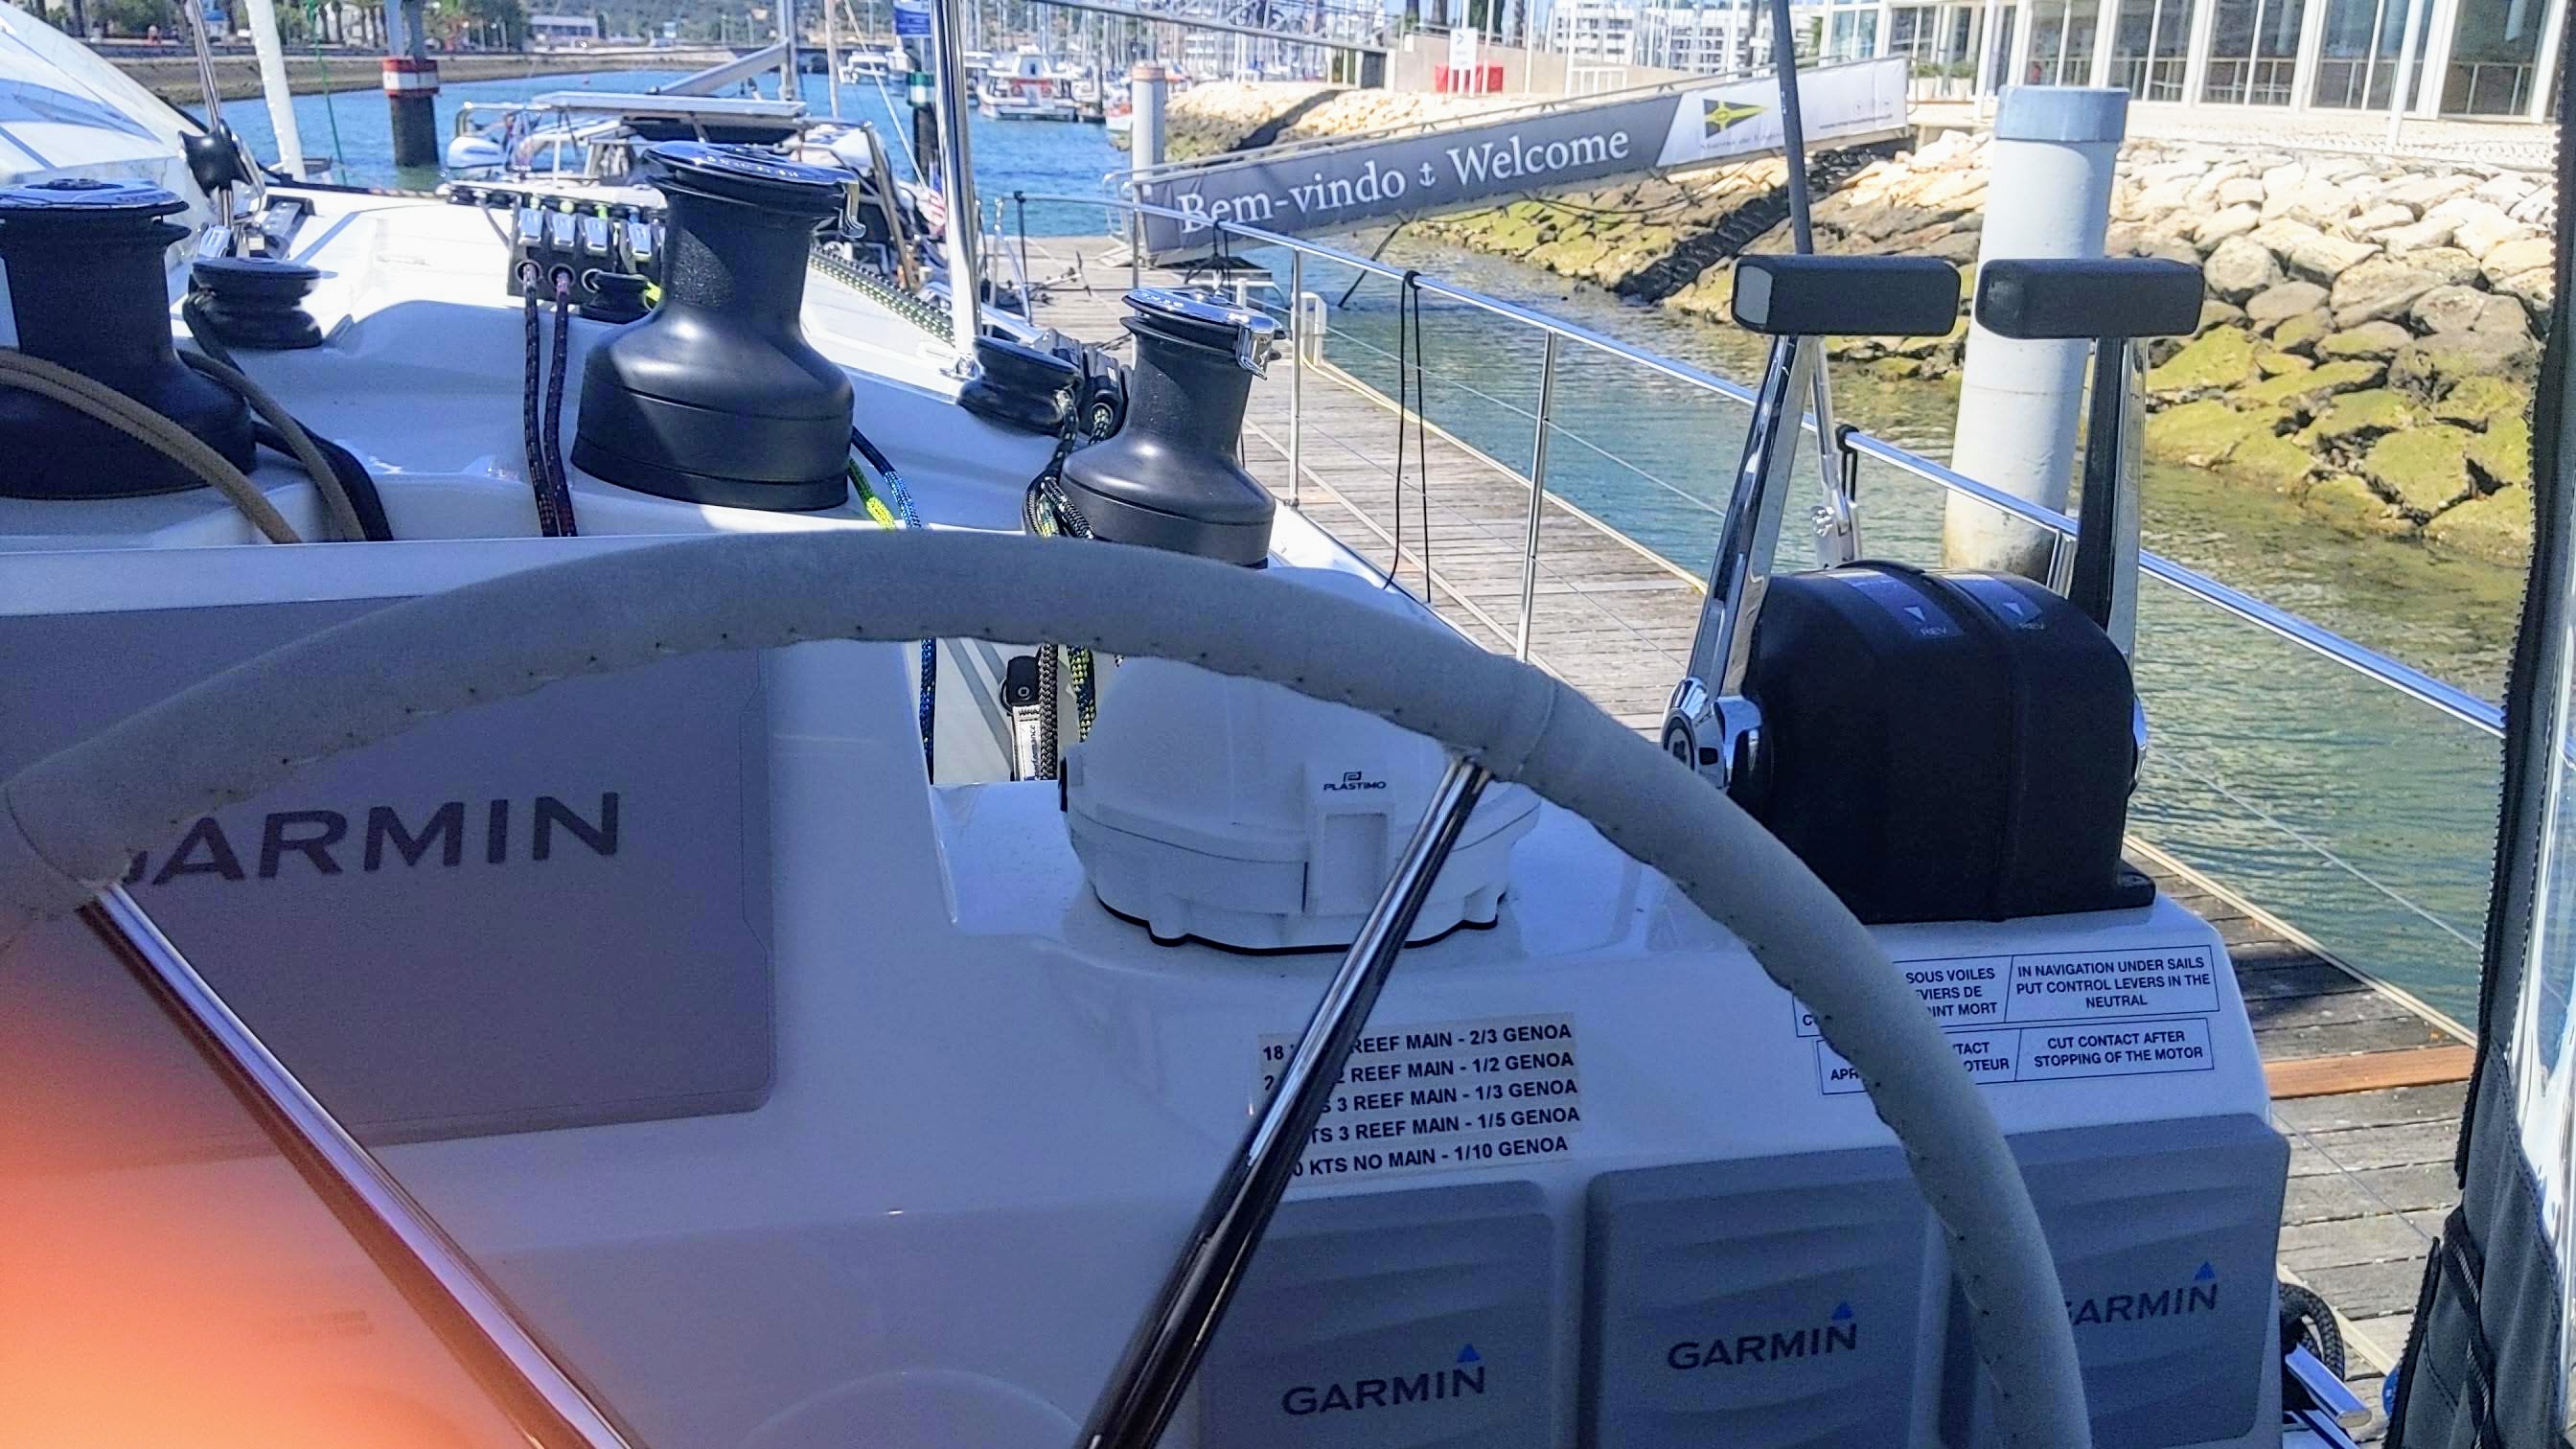
We ticked the box that gave us the factory installed Garmin instruments and in hindsight we should have gone with what we knew – namely Raymarine. The lack of some functionality is a pain – most notably the lack of a Restart XTE function. We could have also specified larger screens and dropped the Garmin Smart Cruising option, which we ended up transferring across to the Victron Cerbo/GX Colour as we don’t want to have to turn on the chartplotter every time we want to check our tank and battery levels.
We also got the Garmin Panoptix Forward Facing Sonar and Uchimata made a unilateral decision to install it just in front of the lifting straps, when it should have been installed further forward. Now we will have our stress levels sky high whenever we lift the boat. A bit of consultation would get a much better result.
Keeping Track of the Electrons (and Tank Levels)
We got Pochon to install a Cerbo GX and its associated GX Colour Screen. These required a Smartshunt and a Victron Battery Temperature Monitor, which were also needed for the SmartSolar MPPT VE.SMART Bluetooth Network. This works really well, you can get up each morning and check how the batteries, solars and tank levels are going. However there is a hardware problem with the Wifi antenna and the HDMI cable being too close to one another meaning the CERBO GX cannot connect to the boat’s Wifi. Have played around with the channels on the wifi router as per Victron’s advice but no luck as yet.
The IT Guy Gets Busy
The two Pepwave routers/access points are going well and are receiving Wifi signals from both shore and from a (Euro a Day) MEO SIM card, installed in the PEPWAVE BR1 unit. Hanging off that is our Synology NAS with all our movies and a Sonos Port that allows us to play music through a Sonos Wifi connection (instead of Bluetooth off a phone) through both our Fusion/Bose system and a Sonos Move portable speaker. I really like having Sonos on a boat.
We also have a Mikrotik Metal WIFI extender installed up the mast but my IT skills are sadly lacking and I’m struggling to integrate this in with the Pepwaves. I’ll wait until one of my IT mates comes on board to tackle this one.
Fresh Water Flushing
With our toilets being all fresh water, water is now more important than ever. We went with the ESSBASE ESW901 (105 litre an hour 12V system) and that seems to be going well. We got a full set of spares including a spare pressure pump so we are able to keep this unit up and running.
We installed a triple filter system for dock water and a Grohle under sink system with a carbon filter for drinking water. This Grohle unit is really cool as its all integrated into the one faucet meaning no more holes need to be drilled into the benchtop.
Bright Shiny Stuff.
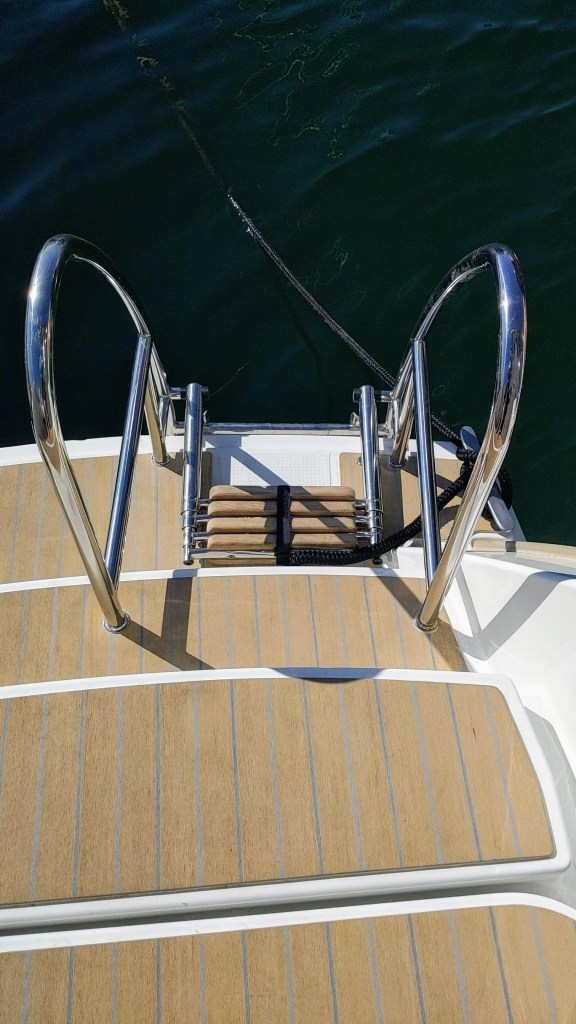
Romu, the Stainless Steel guy did really well out of us. We decided to go with 32cm high SS handrails down the sides of the boat and they are a great safety addition. The three teak steps to get up to the mast work really well. Finally, we quite liked our swim ladder on La Mischief as opposed to the FP one; which we ripped off and replaced with a you beaut custom designed swim ladder, with nice high handles, especially good for getting out of the water with a heavy dive tank on. Now looking forward for some nice weather and warmer water to swim in so we can actually use it.
Blowing in the Wind
For colour, we’ve gone for both an Incidence Blue geneker and a Multi-coloured parasailor once again. Parasailor gave Dee carte blanche to get out her set of crayons and design the Parasailor (for free as its our second). The parasailer is 170m2 (the other option was 190m2). We chose the smaller option because it will get most of its use in the trade winds crossing oceans day and night and the smaller one is more manageable with the higher winds, especially when we plan to leave it up during squalls (as we did during our last Atlantic crossing). Uchimata installed a nice setup for the parasailor so we can easily run both the guy and sheet for each side back to two jammers on a single winch.
The main is a square top and we ditched the Karver hook in favour of the old lagoon way of rigging it with the dyneema line pulling it close to the mast as she goes up. We also went with a 12mm dyneema cored halyard, as opposed to the 14mm halyard, and high end Harken C batten cars. She goes up and down like a dream.
Bad Guys Beware
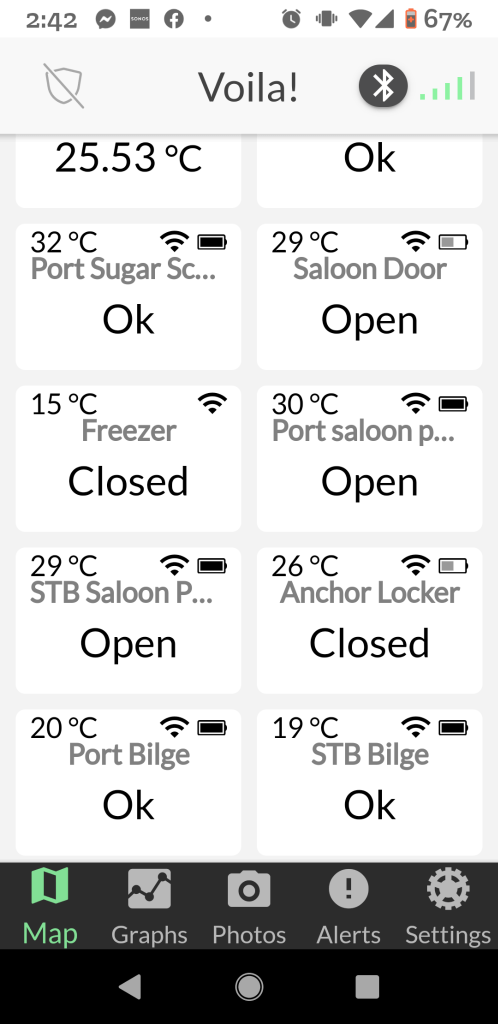
We’ve just finished installing the BRNKL system from Canada. It gives us peace of mind whilst ashore, telling us if Voila has moved out of its geofence whilst at anchor, if any motion sensors or door sensors have gone off, if any water has got into the bilge and if anyone has run into us. The on board 120 decibel alarm should scare off anyone on board. On top of this we have motion detector lights on the sugar scoops and a video camera that sets off with any movement. For A Little Bit of Mischief (our Dinghy), we have a Yacht-Sentinel monitoring system that does pretty much the same. But unfortunately its not working and we have had to return it to them in England to see why.
Sticking to the Bottom
We opted for a 40KG Rocna as we quite liked the Rocna on La Mischief. To this we splurged on 12mm Stainless Steel chain, when we saw how difficult it was to get in to the anchor locker and flake a galvanized chain. 10mm was more than sufficient but I like the extra weight of the 12mm chain on the bottom of the ocean. We added a Mantus swivel so it would swing nicely into position when we brought it back on the boat.
We replaced the woefully inadequate snap shackle on the bridle with a Winchard 2382HR snap hook, on the recommendation of my mate Paul. The bridal needs to be redone as its just tied to the boat and will chafe. We need to get busy with some splicing so that we can shackle it to the boat using two rings spliced in to a new bridal.
We bought a Fortress FX55 as a secondary anchor, to daisy chain off the primary anchor when more holding power is required.
For the dinghy, Mantus have a neat 2KG anchor pack, that together with some SS chain, makes a nice solution.
Comfort Pack
Once we worked out we would be moving on board at the end of winter, we added a cockpit tent to our order. It will be also useful to hang the sunshades off when we get around to getting these.
We went with traditional slats on the 3 guest bedrooms but for ours we went with the Froli system on the recommendation of Michael and a few Youtube channels.
We missed a couple of tricks ordering the factory installed flexiteak (as it is not finished off with nice borders) and a much larger aftermarket cockpit fridge (read beer and wine) could have been fitted in the area provided.
Getting Busy in the Engine Rooms
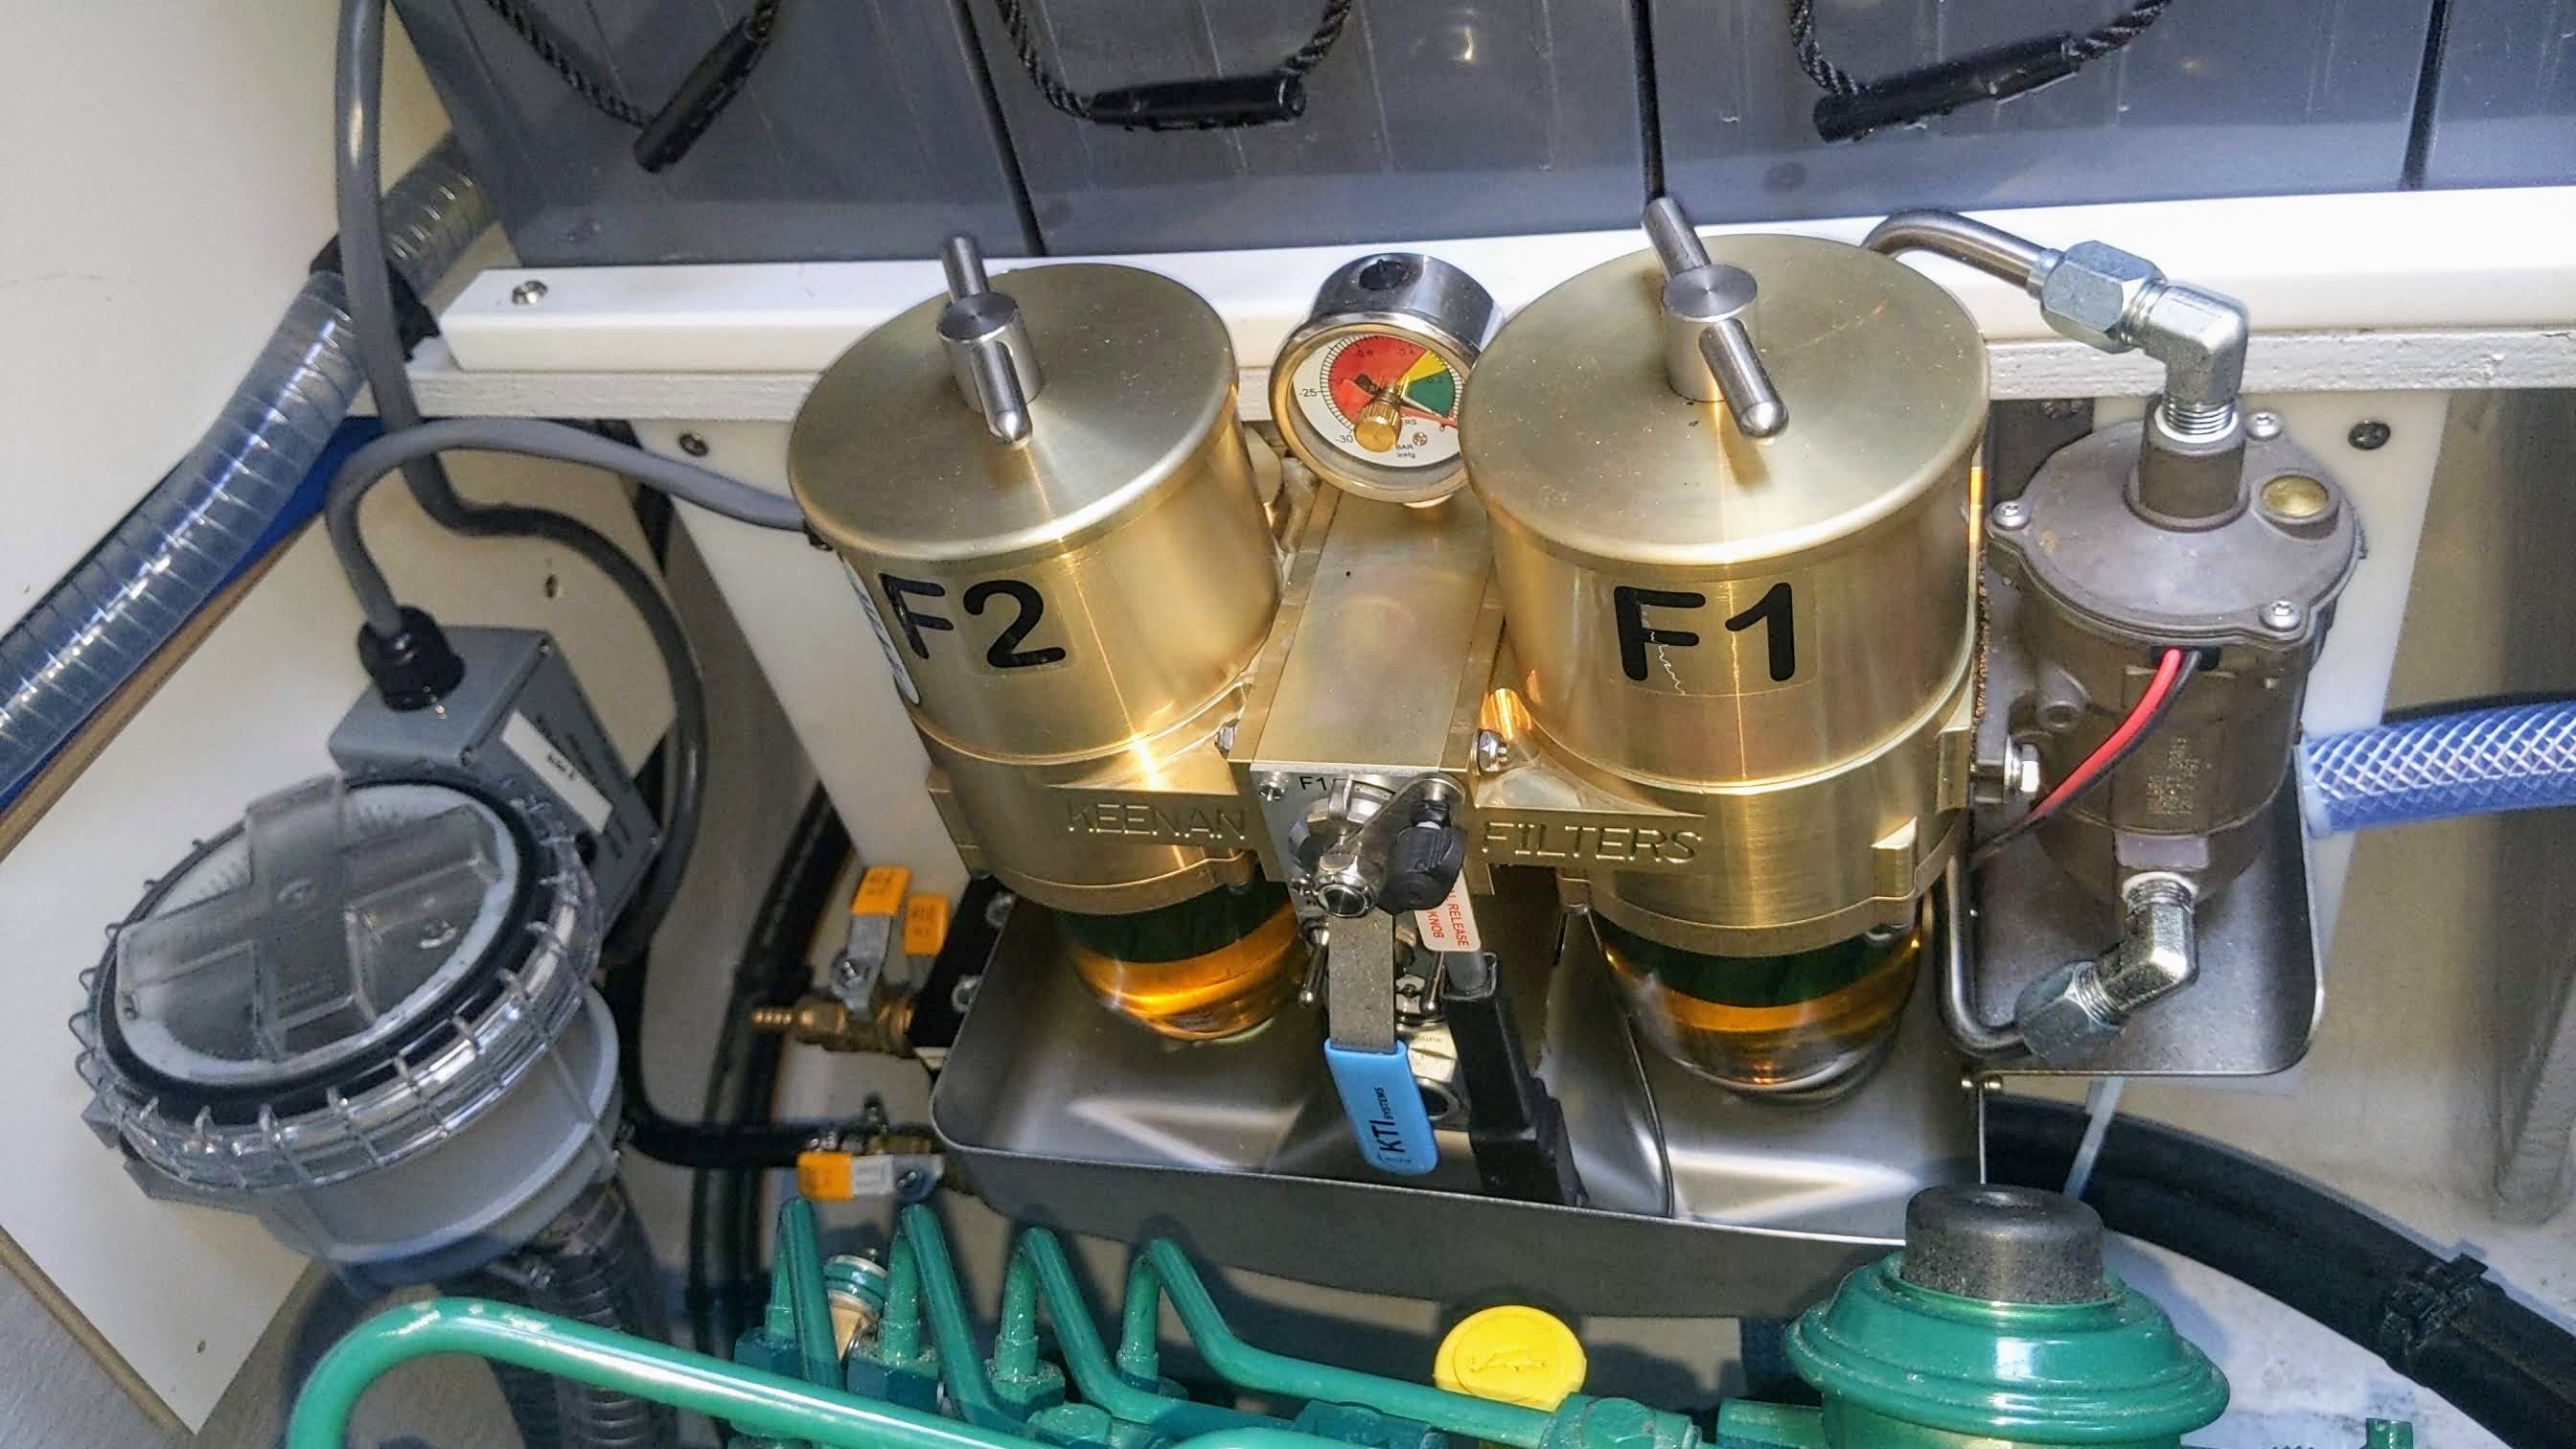
We’ve had a few friends who have previously experienced engine issues from bad diesel over the years and we were determined not to join them in this misery. So we ordered a Keenan Fuel System whilst we were in the USA and had it shipped from Fort Lauderdale with all our other gear from La Mischief, using East Coast Shipping, which worked well. Whilst in La Rochelle, we sent Alsino into the Engine Bays to install this very impressive looking system for baby bottom clean diesel. With this system, we can easily swap over to new fuel filter if one becomes clogged, we can polish the diesel in our tanks and we can also pump diesel from one tank to the other to balance things up.
At the same time, Roms helped us source some Automatic Fire Extinguishers for the Engines Rooms and Alsino fitted these.
Bringing it All Back to The Helm
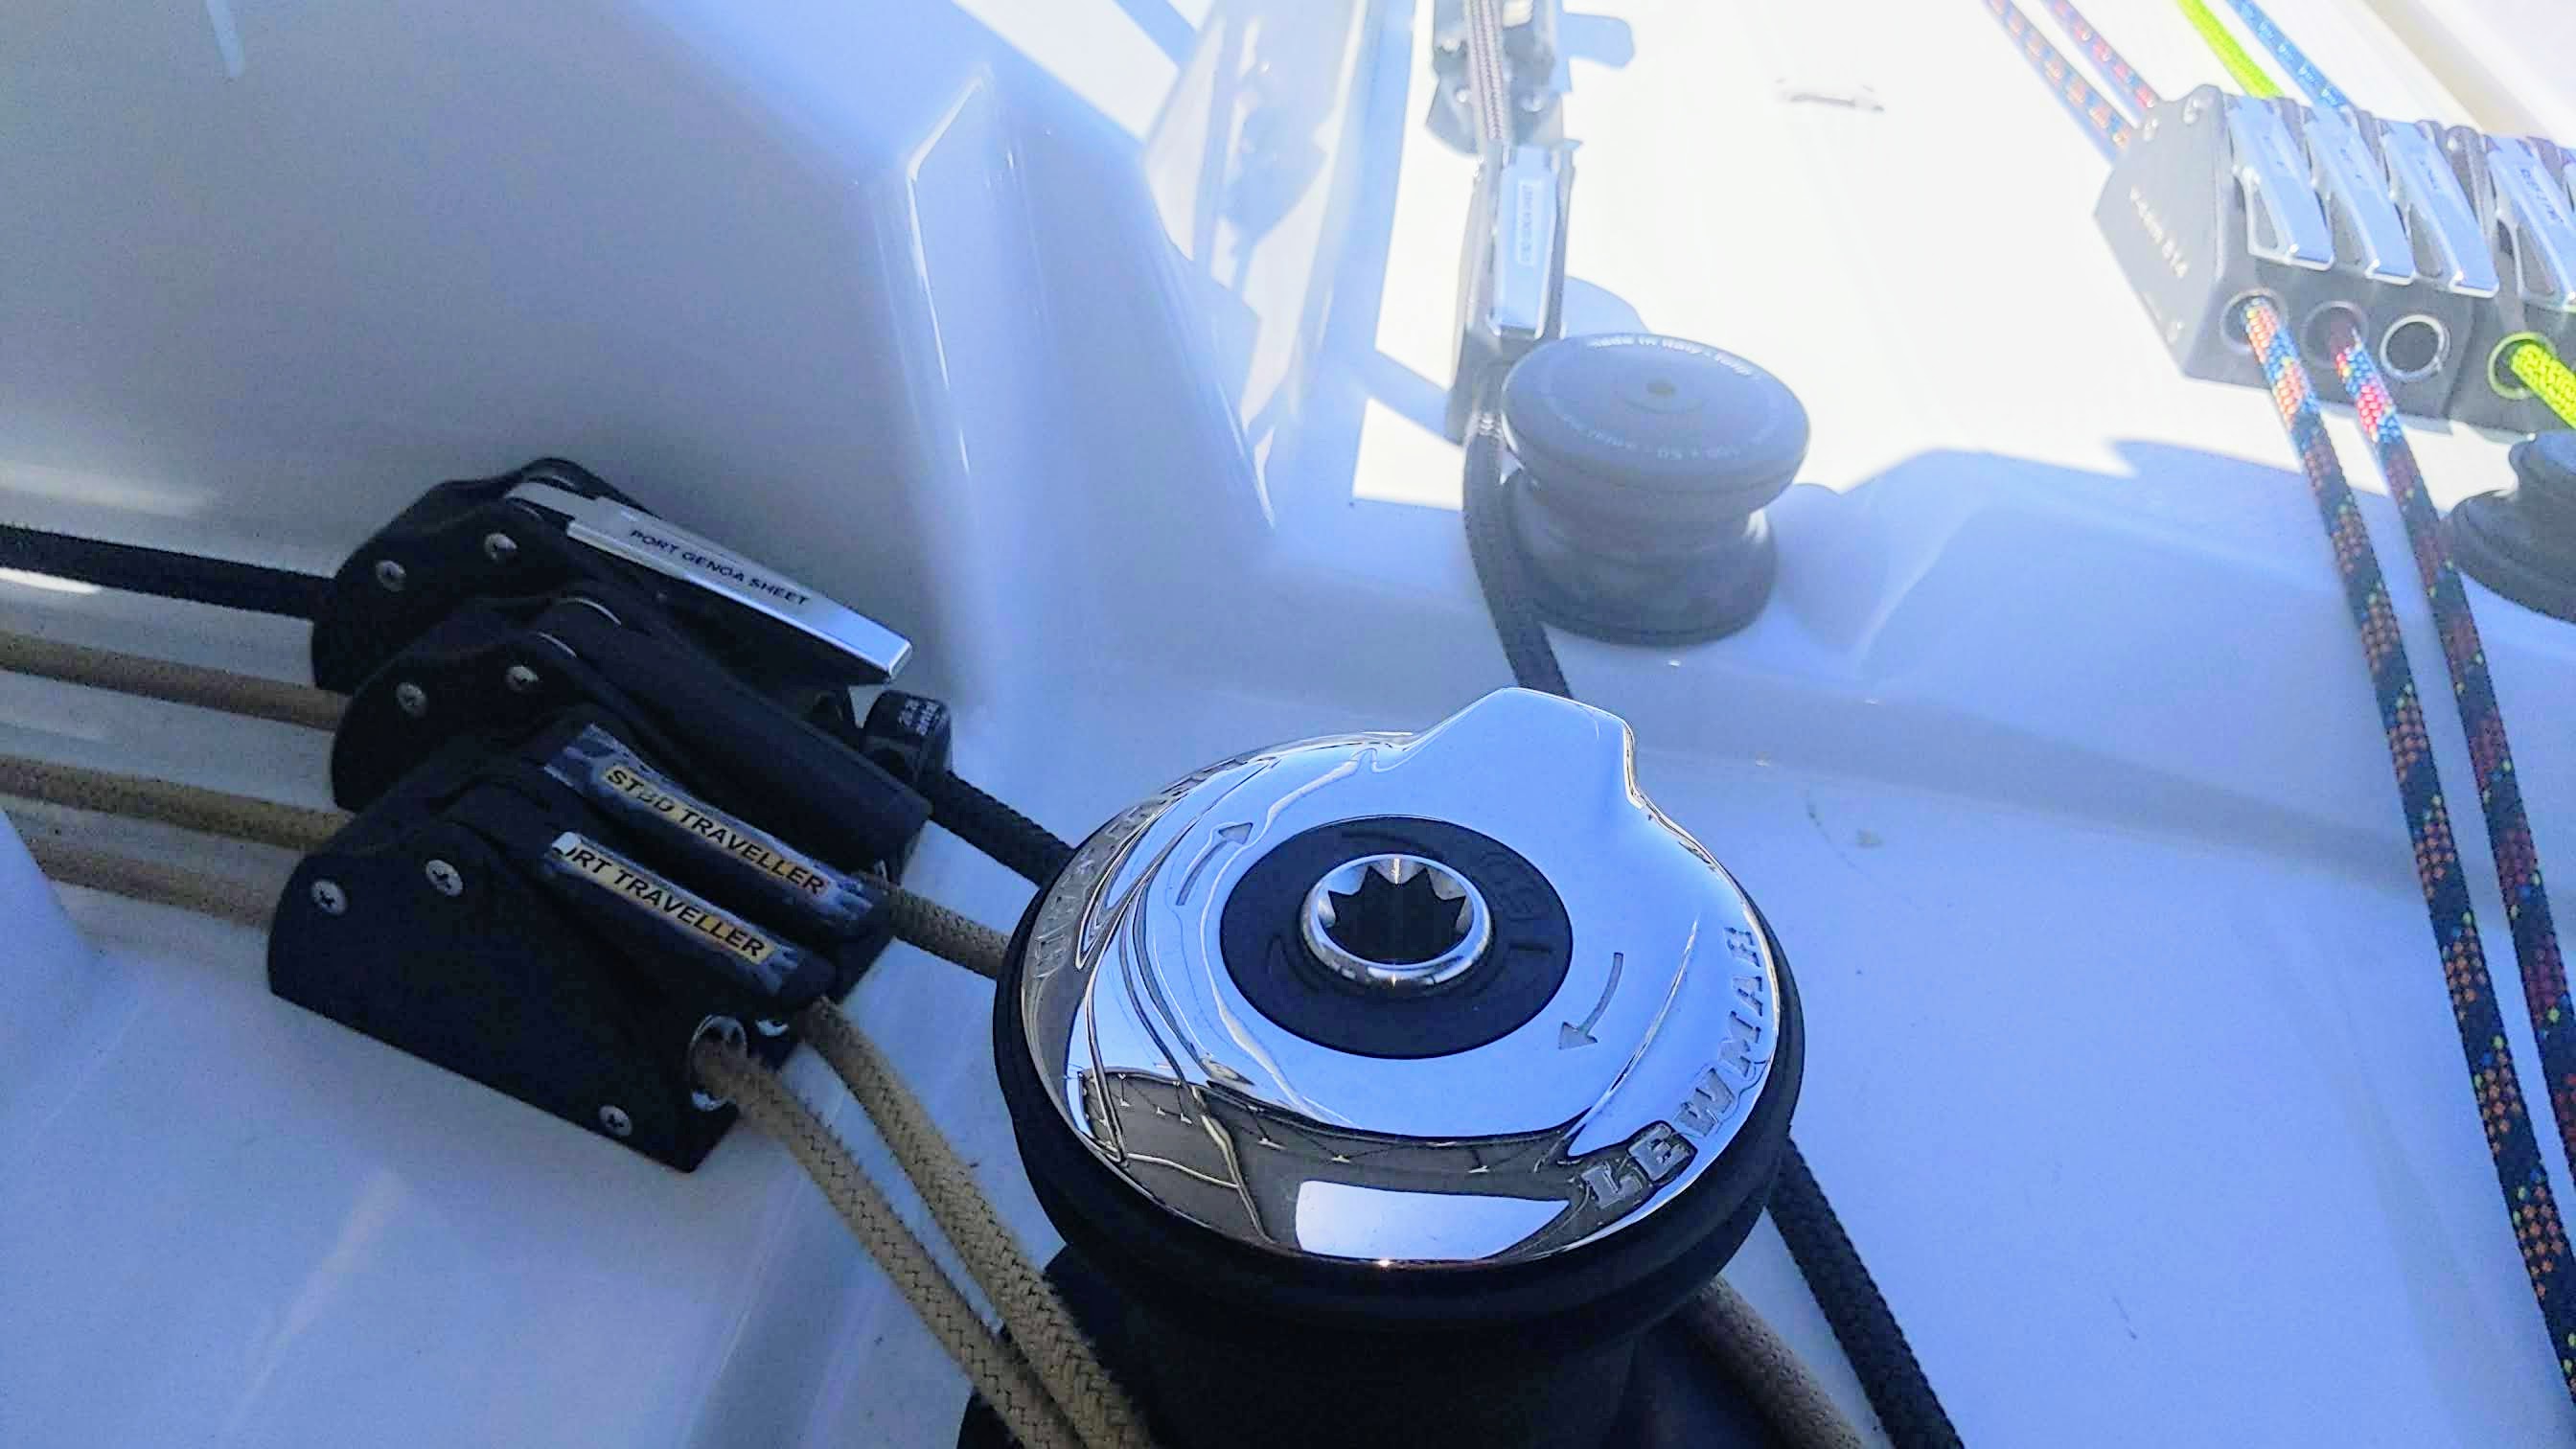
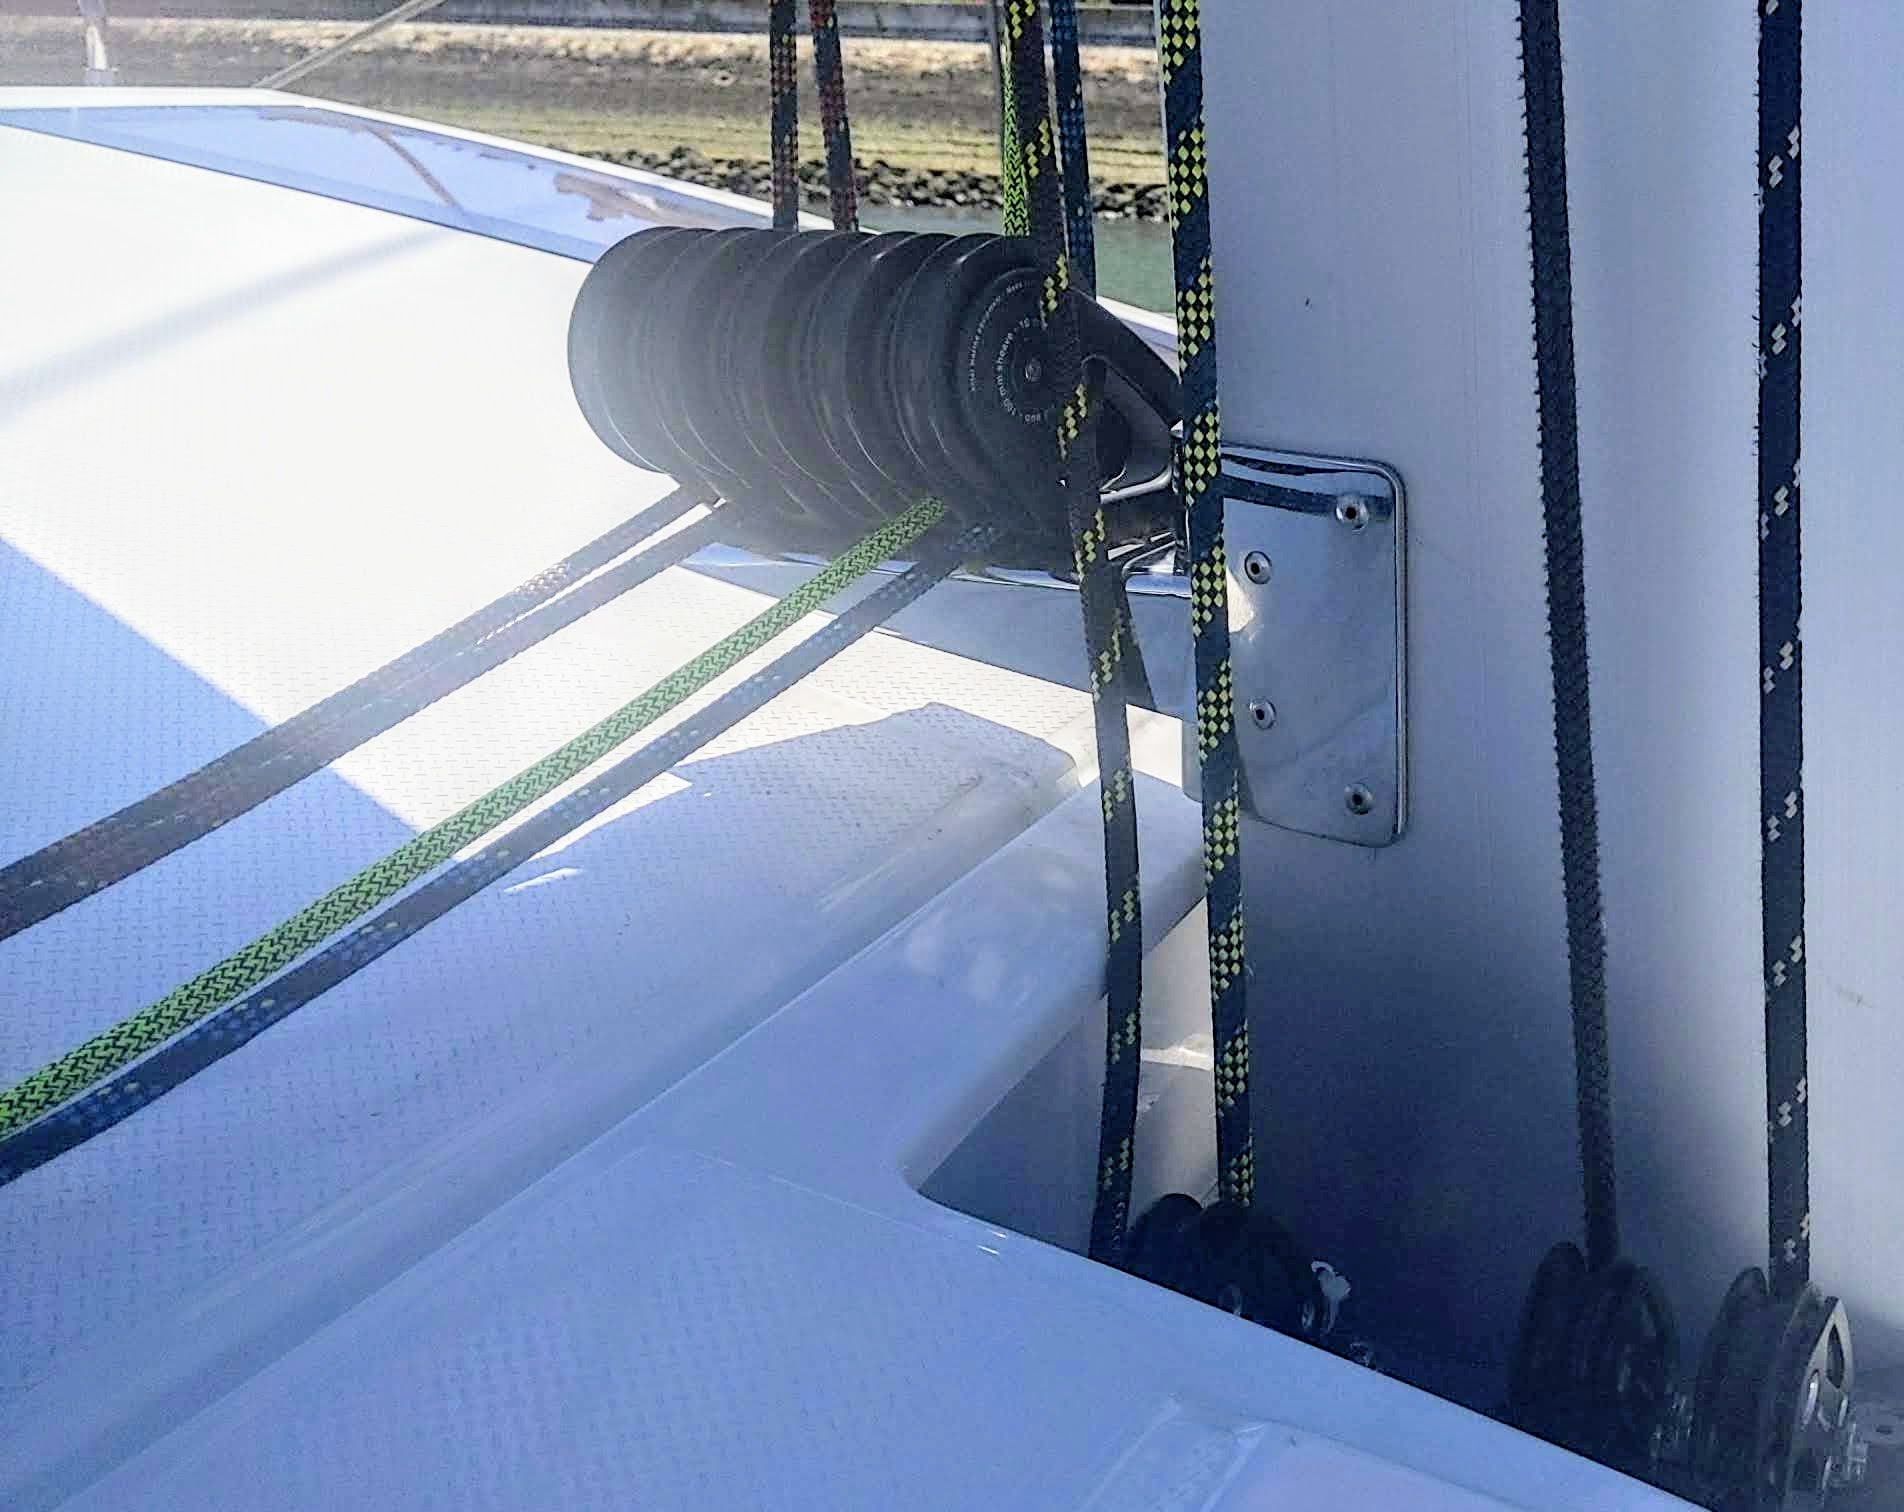
One of the things that we enjoyed with all our other boats was the ability to do everything without leaving the safety of the helm. The Fountaine Pajots have a different setup with no jammers for the Genoa lines, the Spinnaker halyard, or the Topping lift. Instead they expect you to either leave stuff on winches, organize a visit to the mast and/or remove and replace lines on blocks and clutches whenever you want to use them. Only Reef 1 was automatic, the other 2 needed to be clipped on at the mast, and these two are the ones you use when the weather turns bad and your enthusiasm for gymnastics on a mast step in large seas is at a low point.
In these situations where major modifications are required, I’m a firm believer in picking the brains of others, and luckily there’s a few Sabas and one Saona who’ve already solved these issues with major Pit Redesigns by the time I got to do mine. Thanks to Quest, Ghost and SY8 for all their input.
There were a few challenges along the way. Pulling off the ceiling panels was the first. NASA would be proud of the glue FP use to stick these on. I employed Loic from La Rochelle to help us out and he came equipped with a range of tools and techniques to get them off without damaging them. Still it took him 2 full days before the last panel came down.
The next challenge was Brexit. Products from the likes of Spinlock were impossible to order. Luckily Antal came from Italy and the Chanderlies could get hold of these part fairly quickly. However there were still a couple of rollers that we had to go up a size and a 5 way set of rollers became a 2 and a 3. We got Romu to make a Bale for the bottom of the mast to attach five vertical blocks to, and then we needed to get him to readjust the angle of the blocks when he didn’t get it right. As well as the new blocks, clutches, rollers, and frictionless blocks, we bought new dyneema cored lines for the reefing lines so we could go down from 14mm to 12mm and make them run well. All in all it took Loic a whole week to finish off this project and so far its worked well on our way down to Portugal. A very necessary and satisfying project.
We’ve left one clutch free for an outhaul but this will wait for another day.
Marine Wire – Whats That?
When it comes to tinned wire or heat shrink connectors, the French and Portuguese just wave their hands in the air and say “what are you talking about?”. So to get these you need to go internet shopping in Germany or Sweden. Paul put us onto svb24.com and I’ve just placed my first order so lets see how it goes. Remember this when you buy a French boat as all the wiring will be non-tinned wiring.
Still on the Drawing Board
Whilst we have been pushing through our project list, we still have some more stuff to do:
Finish installing Lightning Protection system (Uchimata refused to help out here meaning we need to pay for another lift here).
Install Jet Thruster system.
Connect Keenan Systems installed in each engine room together so we can pump diesel from one side to the other.
Sunshades
Flyscreens on all hatches and portholes (this is proving difficult as Lewmar don’t make them).
Install Engine Shutoff system for Automatic Fire Extinguishers.
Install Fans x 10
Install Gas Detection and Shutoff Solenoid for Propane/Butane system.
Fit automatic anchor light
Handrails for stairs
Build workbench in STB Forepeak
Install Bypass Switches for MDI units on Volvo Engines
Install Rose Joint on Steering Arm to stop Flexing and Wear from SS Bolt on Aluminium.